

Snow Leopard Pocket Guide:
TThis chapter covers how to run applications, as well as how to install and update them. And we can't talk about applications without looking at the Dock, Apple's go-to place for accessing applications (and more).
Whenever you're doing something in Mac OS X, you're doing it in an application. Writing in Microsoft Word or BBEdit; correcting photos in iPhoto or Adobe Photoshop; crunching numbers in Numbers; editing video in iMovie...each application is the difference between interacting with your Mac and having a box of plastic that props up your television.
This chapter covers how to run applications, as well as how to install and update them (a more complicated topic than one might expect). And we can't talk about applications without looking at the Dock, Apple's go-to place for accessing applications (and more).
Launch Applications
Starting an application is known as launching, no doubt because in the early days of computers, "launching" sounded more exciting than "wait several minutes while the machine copies data to its memory." Technology has advanced, thank goodness, so now most applications start up in a few seconds. Use any of the following methods to launch applications.
-
•In the Finder, select an application and double-click its icon. Programs are stored in the Applications folder (choose Go > Applications, or select the Applications item in a window's sidebar).
-
•If an application resides in the Dock, click its icon there (see "Using the Dock," later in this chapter).
-
•Click the Spotlight icon in the menu bar (or press Command-space) and start typing an application's name (Figure 4.1). Click it to launch.Figure 4.1 Find and launch applications using Spotlight.

-
•In the Finder, double-click a file to open it; the application associated with that file launches if it's not already running.
-
•With an application or file selected, press Command-down arrow or choose File > Open (Command-O).
Open files using a different application
When you double-click a file in the Finder, which application will open it? The answer depends on the filename extension. Some formats are specific to one application; others, such as those ending in .pdf or .doc, can be read by many programs.
-
•Drag a document onto an application's icon to open it in that program.
-
•Select the file and choose File > Open With, and then choose an application. (If the program you have in mind isn't listed, click Other and locate it.) The Open With option appears on the contextual menu, too (Control-click or right-click a file to view the menu).
Change a file's default application
If you double-click a file and an unintended application launches, do the following to change which program is assigned to that file type.
-
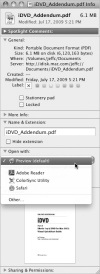
1.Select a file in the Finder and choose File > Get Info (Command-I) to bring up the Get Info dialog.
-
2.Under Open with, choose an application from the pop-up menu to use for opening that file (Figure 4.2). If the program you have in mind isn't listed, click Other and locate it.Figure 4.2 Choose an application to open the file.
-
3.To associate all files of that type to one application, click the Change All button in that pane.
-
4.In the dialog that appears, click Continue to apply the change. TIP
I've used LaunchBar (www.obdev.at/products/launchbar) for opening applications (and doing much more) since before Apple introduced Spotlight. I find it to be more responsive and highly recommend it.
The Dock
The Dock, that three-dimensional row of icons that runs along the bottom of the screen, performs several duties. Primarily it's an application launcher, but it also shows you at a glance which programs are currently running. Its contents aren't limited to applications, either: store documents and folders there to access them quickly without digging through the Finder to locate them.
Open applications from the Dock
The names of items in the Dock appear when you move the pointer over them (Figure 4.3). To open an application from the Dock, simply click its icon. While the program is running, a white dot appears below it.

Figure 4.3 Click an application's icon on the Dock to open it.
A program doesn't need to be in the Dock before it can be opened. Once any application is launched, its icon appears. When you quit the program, its icon is removed.
Dock Shortcut Commands
The following shortcuts make working with Dock items faster.
-
•Command-click any Dock icon to reveal the original item in the Finder.
-
•Option-click an application's Dock icon to hide all of its windows.
-
•Control-click or right-click an item to reveal a contextual menu containing more options, including a list of a document's open windows.
Choose which applications appear in the Dock
Apple loads its favorite applications into the Dock when Snow Leopard is installed, but you can add, remove, and rearrange icons to suit your preferences.
Add an item
Drag an application (or any other item) from the Finder to the Dock. Other icons politely move out of the way to welcome the newcomer.
NOTE
When you add something to the Dock, you're actually adding an alias that points to the original. The actual file remains in place within the folder hierarchy.
Another way to add an item is to move it to a new position. Drag the icon of a running application elsewhere in the Dock; Mac OS X assumes that if you're going to enough trouble to specify where you want the program to appear, you want it to stay put.
Remove an item
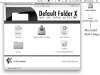
To remove an application, drag its icon from the Dock; it disappears in a puff of smoke. Alternately, Control-click (or right-click) the icon and choose Options > Remove from Dock (Figure 4.4). (The Finder and Trash, and any running applications, cannot be removed.)

Figure 4.4 Control-click an application to reveal options.
Access folder contents using Stacks
The Dock is dominated by applications, but you can put anything into it for easy access. Simply drag a file or folder onto the right edge, just beyond the divider (Figure 4.5). One helpful trick is to move the folder containing an active project's files to the Dock.

Figure 4.5 Dragging a folder to the Dock.
TIP
For fast access to your programs, drag the Applications folder to the Dock.
To make it easier to reach the files in a folder, Apple created Stacks. Click a folder in the Dock to view its contents (Figure 4.6).

Figure 4.6 The Stacks fan view.
Control how Stacks appear
Control-click or right-click a folder in the Dock to bring up a menu of options, including how the contents are sorted; whether the icon appears in the Dock as a single folder or a layered stack of files; and how to display the content when the folder is clicked:
-
•Fan. After clicking the folder in the Dock, click any file or folder in the fan to open it; files open in their associated applications, while folders open in new Finder windows. You can also click Open in Finder to view the contents of the folder in a window.
-
•Grid. Folders with many items appear in a grid. Unlike the fan display, if you click a folder here, its content appears within the grid. If there are more items than will fit in the window, a scrollbar appears at right. Click the back button to return to the enclosing folder's contents (Figure 4.7).Figure 4.7 Viewing a subfolder in the grid view.
TIP
With a folder open in grid view, press an arrow key to highlight the first item. Then, use the arrow keys to select the item you want, and press Return to open it. Or, press Esc to dismiss the window. -
•List. The contents appear as list items. Highlighting a folder name displays another connected list of items.
-
•Automatic. Mac OS X chooses whether to display the contents as a fan or a grid (but not a list) depending on how many items are in the folder.
TIP
Unfortunately, Stacks prevents the one action you would expect from clicking a folder in the Dock: simply opening the folder in a new window (which was the normal behavior before Stacks arrived in Leopard). To do this, Control-click or right-click the folder and choose Open "folder name" from the pop-up menu.
Customize the Dock
One of the first things I did with the Dock was move it to the right edge of my screen—I find it gets in the way at the bottom. A number of options are available for customizing the placement and appearance of the Dock. You can find these controls in three locations: choose Apple > Dock; open the Dock preference pane; or Control-click the divider between applications and documents.
-
•Turn Hiding On. With hiding enabled, the Dock slides off the screen when not in use. Move your pointer to the Dock area to make it reappear.
-
•Turn Magnification On. As you move the pointer over Dock items, they grow so you can see them better (Figure 4.8). With this feature enabled, control the amount of magnification in the Dock preference pane using the Magnification slider.Figure 4.8 Dock magnification.

Magnification is helpful when you have many icons, because the Dock automatically shrinks to accommodate them all. However, I find it more annoying than useful. -
•Position on Screen. Choose Left, Bottom, or Right. Positioning on the edges gives the Dock a different, simplified appearance (since the three-dimensional shelf doesn't make sense along the side).
-
•Resize the Dock. Click and hold the divider in the Dock and drag up or down to make the entire Dock larger or smaller.
Minimize windows to the Dock
The Dock is also a temporary holding pen for active windows. When you click any window's Minimize button (the yellow one at the top left corner), the window is squeezed into a space in the Dock. You can also double-click a window's title bar to minimize it, or choose Window > Minimize (Command-M) in many (but not all) applications.
To retrieve the minimized window, simply click its icon in the Dock.
Minimize into application icon
A new setting in Snow Leopard aims to unclutter the Dock if you tend to store lots of documents there. In the Dock preference pane, enable the option labeled Minimize windows into application icon. A window remains open but doesn't appear on the Dock. To make it visible again, Control-click or right-click the icon and choose the window name from the pop-up list that appears.
TIP
Hold Shift when you click the Minimize button to watch the window's animation in slow motion. This feature was used in the first demos of Mac OS X to show the power of the operating system's graphics capabilities, and apparently was never removed. Why do it? Because you can.
Switch Between Applications
Mac OS X can juggle more than one running application at a time, but can you? Here are ways to switch between active programs.
-
•Click an icon in the Dock to bring it forward.
-
•Click an open document window to bring its application to the front.
-
•Press Command-Tab to display running applications as a row of large icons in the middle of the screen. Continue pressing the Tab key until the application you want is highlighted, then release the keys to bring that application to the front.
You can also keep the keys pressed to cycle through the icons. Or, after you press Command-Tab, move the pointer to select the program you want. Or (yes, there's one more), press the left and right arrow keys while the icons are visible.
TIP
With the onscreen switcher visible and the Command key still pressed, highlight an icon and press Q to quit or H to hide (or show if already hidden) that application.
Show and hide applications
As you open more applications, their windows overlap one another, leading to a visual mess. Any application can be hidden from view when you're not using it. From the application menu, choose Hide application name, or press Command-H. You can also choose the Hide command located on the contextual menu that appears when you Control-click an icon in the Dock.
The program continues to run in the background—it's just out of the way. You can quickly see if a program is running by looking for the white dot beside its icon in the Dock.
NOTE
When you switch applications using the Dock or Command-Tab, all windows of that application come forward (except those that are minimized, of course).
Closing Documents vs. Quitting an Application
Here's something I see all the time. A person is finished with a document, let's say it's a Microsoft Word document, and so they click the red Close button in the upper-left corner of the document window. They then switch to another program and assume they quit Word. The problem is, Word is still running in the background; some programs consume a fair amount of system resources even when not active, which reduces performance in other applications.
Apple doesn't make this situation easier, as some of its software (like iMovie) quits when you close its one application window. Getting around this interface confusion is simple: be sure to quit an application when you're done with it. If you need it again, it will launch faster than the first time because Mac OS X keeps some vital information for starting up programs in its cache on disk.
Exposé
Apple has clearly spent a lot of time figuring out how to deal with visual overload as you work. Exposé is another feature I thought would be of limited real use until I found myself often reaching for it.
With a keystroke or a mouse movement, you can separate all that clutter into a sense of order in one of three ways. Then, click the window you're looking for to bring it to the front.
-
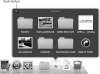
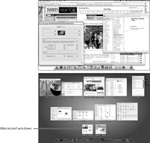
•All windows. Press F9 to view all visible windows in an orderly grid (Figure 4.9). Minimized windows appear smaller, below a dividing line on the screen; hidden windows remain invisible. Click a window to bring it to the front and exit Exposé.Figure 4.9 Exposé, before (top) and after (bottom).
-
•Application windows. Press F10 to view all windows from just the front-most application. Other programs' windows are temporarily hidden while Exposé is active. When you're in Exposé's All windows mode, press Command-Tab and choose an application to switch to the Application windows mode.
Snow Leopard adds yet another way to access Exposé. Click and hold an application icon in the Dock for the Application windows view. -
•Show Desktop. Press F11 to push everything aside temporarily, revealing the Desktop.
Exposé on Recent Mac Laptops
Current MacBook Pro models differ from earlier Apple laptops in how the function keys are laid out. While F9, F10, and F11 still work, you can also press F3 (which is adorned with an Exposé icon). That one key offers all three modes:
-
•Press the F3 key by itself to reveal all visible windows.
-
•Press Control-F3 to view all windows from just the frontmost application.
-
•Press Command-F3 to push all windows offscreen.
-
•Press Option-F3 to open the Exposé & Spaces preference pane.
TIP
In the Exposé & Spaces preference pane, assign your own preferred keyboard shortcuts. You can also set active screen corners that initiate an Exposé mode when the pointer is moved to a corner of the screen.
Use Exposé to move content between applications
Hooray, we can view windows using whizzy graphic effects. That's helpful for pulling order out of chaos, but there's more to Exposé than just pushing windows around. It can act as a shortcut when copying and pasting information between applications.
Moving files in the Finder
Instead of spending time getting Finder windows aligned so you can move or copy a file from one to another, shuttle it through Exposé.
-
1.Select a file you want to transport and move it slightly to tell the Finder it's in motion.
-
2.Press F9 or F10 to engage Exposé. Alternately, drag the file onto the Finder icon in the Dock and wait a moment for Exposé to activate.
-
3.Drag the file to your intended destination window and hold it there for a second until the highlight around the window flashes. Exposé kicks you back into the Finder with that window frontmost.
-
4.Release the mouse button. The file is moved or copied.
Moving other data
The steps above apply to just about any other data you can move between applications. For example, suppose you want to include a portion of an article on the Web (including images or other formatting) in an outgoing email message.
-
1.Select the content in Safari, then drag it onto the Mail icon in the Dock. Exposé arranges Mail and your outgoing message in a grid.
-
2.Position the pointer over the message window and hold it there for a few seconds (Figure 4.10). The message comes to the front.Figure 4.10 Adding rich data to an outgoing Mail message via Exposé.

-
3.Release the mouse button to add the content.
Install Applications
When the time comes to install other applications on your Mac, several options await. Even now, decades into personal computing, installing software can be confusing. Here are the common methods of doing it.
From a disc
If you purchase a physical copy of a program, it most likely is stored on an installer disc. Insert the disc into your Mac's optical drive and skip ahead to "Installation methods."
Download from the Internet
Thanks to online distribution, you often don't need to bother with discs (and the bloated packaging around most of them).
-
1.Download the software from a company's Web site. It will be packaged as an archive (with a .zip or .hqx filename extension), or as a disk image (ending in .dmg).
-
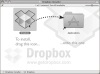
2.Locate the downloaded file. In Safari, you can click the Show in Finder button (the magnifying glass icon) next to the file's name in the Downloads window (Figure 4.11).Figure 4.11 Locating the installer you just downloaded.

You can also open the Downloads folder in your Home folder; Mac OS X puts it in the Dock by default. -
3.Double-click the file to open it. If it's a disk image, a virtual volume appears on the Desktop and, usually, a new window appears with the volume's contents (Figure 4.12).Figure 4.12 A mounted disk image.
TIP
Double-clicking the file in the Downloads folder also opens the disk image and saves a step. However, I'm taking the longer route here to explain where the important pieces reside.
Installation methods
With a disc or disk image mounted on the Desktop, you'll encounter one of the following installation methods.
-
•Drag and drop. Simply drag the software's icon to your Applications folder. The developer may have included an alias to the folder in the disk image, in which case you can just drag to that (Figure 4.13).Figure 4.13 Drag and drop installation.
-
•Run an installer program. Double-click the software's installer program, which should be clearly marked. You'll need to provide your administrator password to grant the program access to write its files, and most likely read and agree to a terms of service contract. Follow the installer's instructions.
After the installation
When the program has been copied or the installer is finished, don't forget to eject the physical disc or mounted disk image: Select it on the Desktop and choose File > Eject (Command-E); click the Eject button in the menu bar; or click the Eject button to the right of the item's name in a window's sidebar. You can also delete the original file stored in the Downloads folder.
Update Applications
Software is rarely perfect when it's released. Bug fixes, security updates, and other issues crop up, which is why you'll need to install updates from time to time. Apple uses one mechanism for updating all of its software, Software Update, while other companies typically include update features within their applications.
Software Update
When new versions of Apple software are available for download, Software Update opens automatically and asks if you want to install them. You can also choose Software Update from the Apple menu to perform a manual check.
-
1.In the dialog that appears, click Show Details to learn what's available. You can also click Install to apply them right away, but I prefer to see what's available first.
-
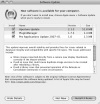
2.In the details view, select an update to learn more about it (Figure 4.14). If you prefer not to install an update, deselect its checkbox (or click Not Now to ignore all updates). Software Update notifies you if any updates require restarting the computer.Figure 4.14 Software Update.
TIP
Another option is to tell Software Update to ignore an update that you may never want to install. Select an update from the list and choose Update > Ignore Update. -
3.Click the Install x Items button to apply the updates. You may need to provide your administrator password to continue.
-
4.When finished, click the Quit button that appears.
TIP
Software Update automatically downloads the updates in the background, which can be a problem if you need to control when large downloads occur. Open the Software Update preference pane and disable the Download updates automatically option. You can also disable the automatic update check, or specify how often it occurs.
Updaters within applications
Most applications now have the capacity to check if newer versions are available. Look for a Check for Updates item in the application menu or Help menu. In some cases, you'll be taken to the company's Web site to download the latest version; see "Install Applications," earlier. Other programs can now update themselves while they're still running.
Expand Your Desktop with Spaces
Do you ever wish you could have a wall of displays to hold all the windows and applications you're running? I've long advocated working with more than one monitor (I have an external display connected to my MacBook Pro), but even that seems limited some days.
Spaces gives you a large virtual environment composed of up to 16 screens. What you do with those screens is up to you: run Mail and iChat in one space, then switch to another space containing Pages so you can work without the constant distraction of seeing new messages arrive. Use another space solely for running Microsoft Windows in VMware Fusion or Parallels Desktop in full-screen mode.
Set up Spaces
To get started, open the Exposé & Spaces preference pane and click the Spaces button. Then, click the Enable Spaces button (Figure 4.15). If you want to create more spaces, use the Rows and Columns buttons.
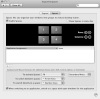
Figure 4.15 The Spaces preference pane.
Assign applications to spaces
An application can be assigned to a space, so that whenever you switch to that program, the environment switches to that space.
-
1.Click the Add (+) button below Application Assignments and choose from the list of running programs, or choose Other to pick something else. You can also drag an application's icon from the Finder to the Application Assignments list.
-
2.In the Space column, choose one of the numbered spaces.
You can also choose Every Space, which enables windows from that application to appear no matter which space you're in. For example, setting iChat to exist in Every Space means it remains visible when you switch spaces.
Switch between Spaces
As I noted on the previous page, bringing forward an application that has a space assignment switches you to that space. Here are a few other methods.
-
•Press Control and an arrow key; an icon representing the visual layout of the spaces appears to indicate which space you've just entered (Figure 4.16).Figure 4.16 The Spaces icon, with space 3 selected.

-
•Press F8, which invokes an Exposé-like overview showing all of your spaces. In this view, you can drag windows from space to space.
-
•Press Control and a number corresponding to the space numbers found in the preference pane.
-
•If you've enabled the Spaces menu bar icon, click it and choose a space.
TIP
Normally, the last option in the preference pane is enabled (When switching to an application, switch to a space with open windows for the application). Turn it off if you want to use windows from one application, such as Safari, in multiple spaces.


Macintosh Special Interest Group (MacSIG)

YOUR COMPANY © 2009 Privacy Policy